Blog · November 1, 2023
WordPress as an Intranet
Setting up WordPress as an intranet with XAMPP. Configuration for internal networks, installing WordPress, and a recommendation for an intranet-suitable theme.

If your company has sensitive data that should not be on the internet, your own intranet is a good solution. Here your teams can communicate securely and store important documents. WordPress as an intranet is very well suited for this purpose.
As a well-known system for websites, WordPress also has a lot to offer in the intranet area. It is flexible and can be quickly set up and well customized with the help of a large selection of plugins and themes, thanks to its open-source structure and a large user community.
In this article, you will learn how to use WordPress locally as an intranet with XAMPP. You then reach it via your local IP address or „localhost“. I will also show you Woffice, a suitable theme that already comes with the important intranet functions, such as social media features, documents, internal news feeds, and groups.
The Difference Between Intranet and Extranet
Intranet: An intranet is an internal network that is only accessible to members of a company or organization. It is generally used for internal communication, data exchange, and teamwork. Access is usually only via the company’s internal network.
Extranet: An extranet extends access to an intranet to selected external users such as customers, suppliers, or partners. It offers functions similar to an intranet, but with the addition that external stakeholders also have access. Authentication and encrypted connections are often necessary.
Advantages of an Intranet with WordPress
An internal WordPress network decoupled from the internet offers numerous advantages. Here are some of the most important:
Secure environment: With an intranet, you can use themes, plugins, and designs without them being publicly visible.
Higher speed: Local installations generally run significantly faster than their online counterparts.
SEO safety: Since the intranet is not public, there is no risk of accidentally being indexed by search engines like Google.
Versatility: A WordPress intranet can be used for internal blogs, information portals, as an internal social network, or for drafting customer articles and documents.
Easy setup: Setting up a WordPress intranet is surprisingly easy and can be carried out by any PC user with basic knowledge within a few minutes.
A WordPress intranet is thus a powerful tool that can increase employees’ efficiency and productivity in many different applications.
Limitations of a WordPress-Based Intranet
When implementing an intranet with WordPress, there are various challenges and limitations that should be considered. Here are some of the most important points you should keep in mind.
Plugin compatibility: Many WordPress plugins are designed to function in an online environment and require access to external APIs or resources. In a decoupled intranet, these plugins can fail unexpectedly or be restricted.
Outdated software: Since an intranet is not always connected to the internet, it can be difficult to perform regular updates. All of this increases the risk that you are working with outdated software that could have security vulnerabilities.
External support: Since the system is internal and potentially isolated, it is more difficult for external developers to gain direct access for diagnostics or support. This can slow down troubleshooting.
Licensing: Some plugins and themes require regular online license checks. In a decoupled intranet, this can lead to malfunctions.
Performance: Depending on the internal network structure and server configuration, performance problems can occur, especially when large files or media have to be handled.
These factors can affect the effectiveness of a WordPress-based intranet and should be taken into account during planning and implementation.
Setting Up a WordPress Intranet Site via XAMPP

XAMPP is a robust software package that makes setting up a local server environment on your computer a breeze.
This software is essential for creating local WordPress sites, as it includes web server software (Apache), PHP, and MySQL.
XAMPP simplifies the process, which is very complicated for beginners when these components are installed separately.
First, we install XAMPP on the main computer. Then we make the computer available within the network, so that WordPress can later be used as an intranet with the main computer as the server.
Installing XAMPP on Your Main Computer
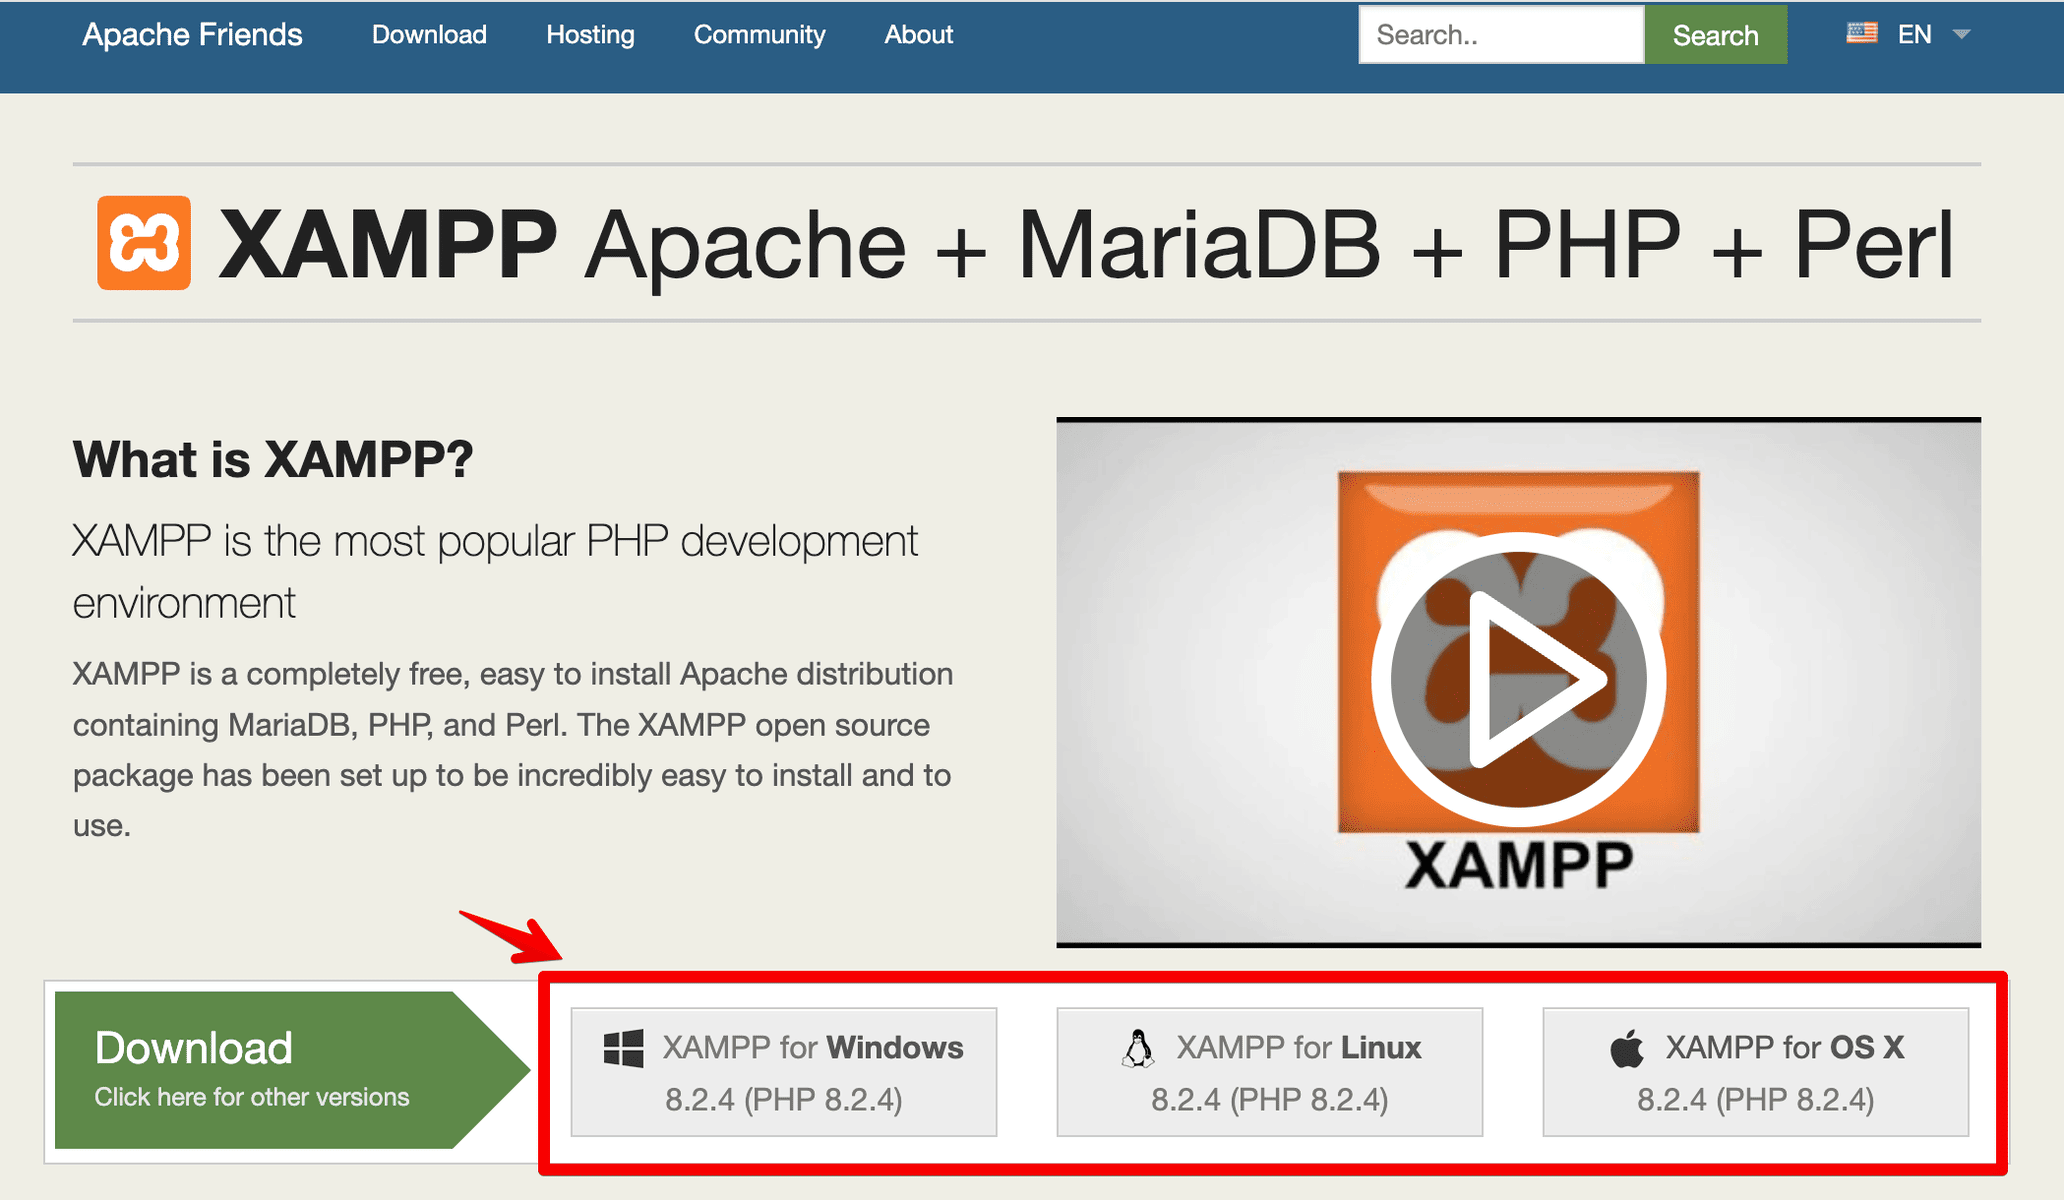
To install XAMPP, go to the XAMPP website and click the „Download“ button for your operating system.
1. Download XAMPP from the website. The size of the installation is approximately 150 megabytes.
2. Run the installation program.
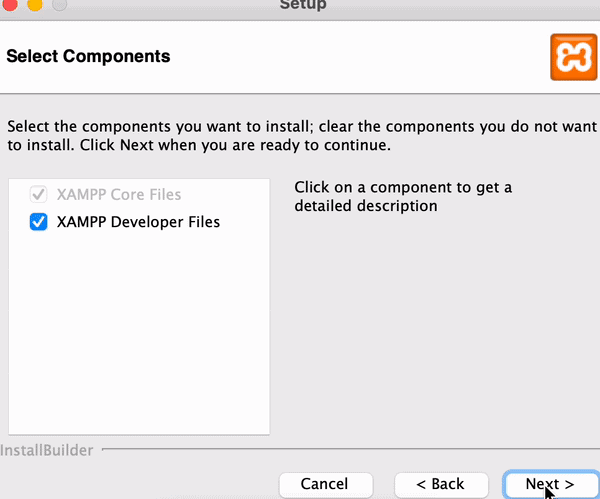
3. Complete the setup wizard. This can take several minutes.
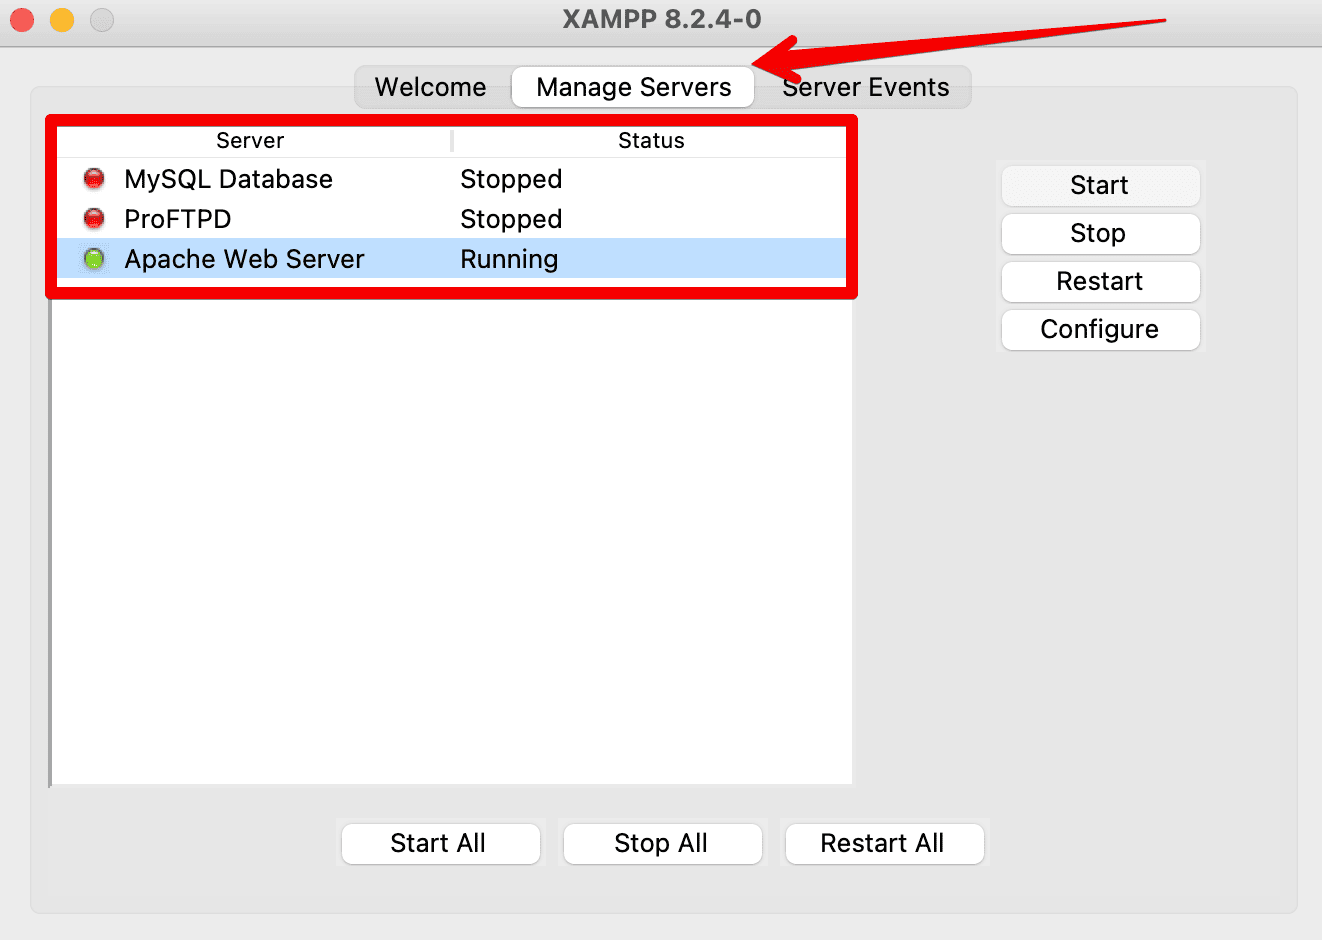
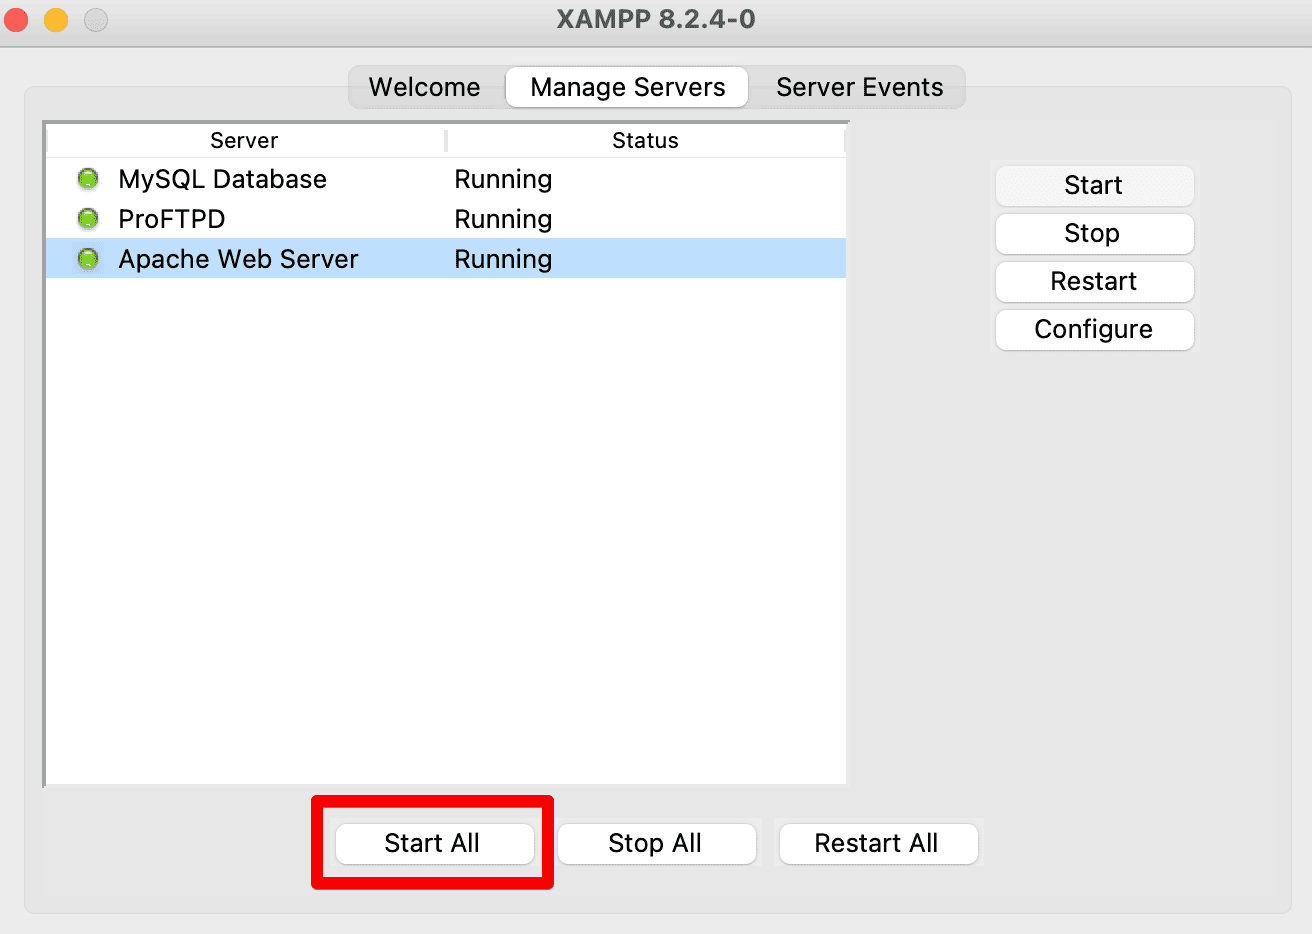
4. After completion, start the XAMPP Control Panel app. Here both Apache and MySQL can be initiated.
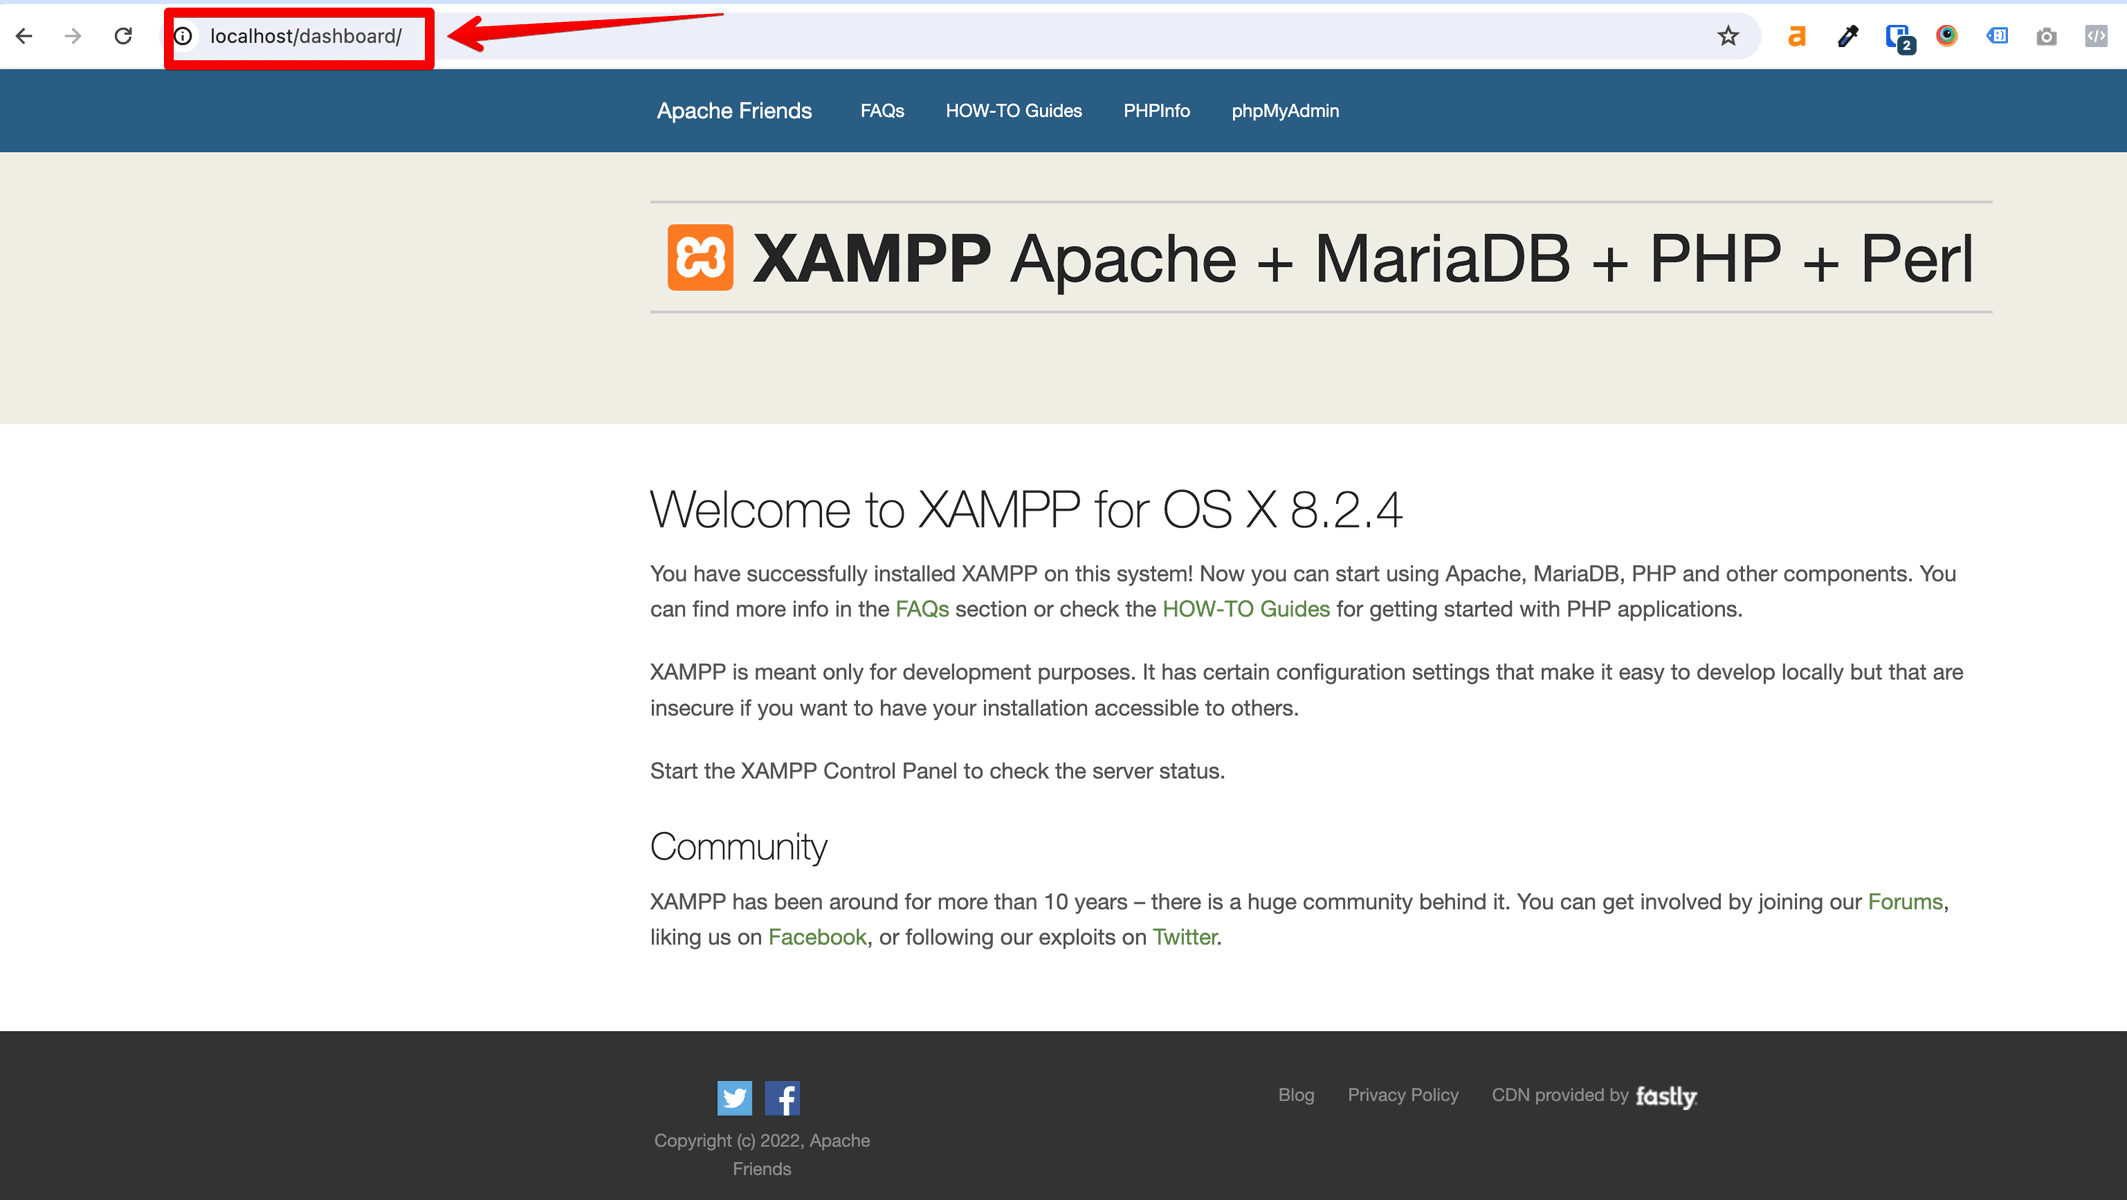
5. Your browser should automatically start with an HTML page predefined by XAMPP. Note the local URL https://localhost/dashboard – this page cannot be found on the internet and is therefore only reachable within your current network.
Remember to allow access for these applications through your firewall. After starting, the application names are highlighted, indicating that you are ready to install WordPress locally with XAMPP.
Making the Main Computer with XAMPP Available in the Local Network
Since localhost is only available within one computer, we next have to make the main computer available within the network. To do this, we find the IP address of the main computer and make it available within the network.
Attention: For the intranet to work permanently, it is important that the main computer has a static IP address and always remains reachable.
1. Go to your XAMPP Control Panel. Click on Manage Servers > Apache > Configure > Open Conf File
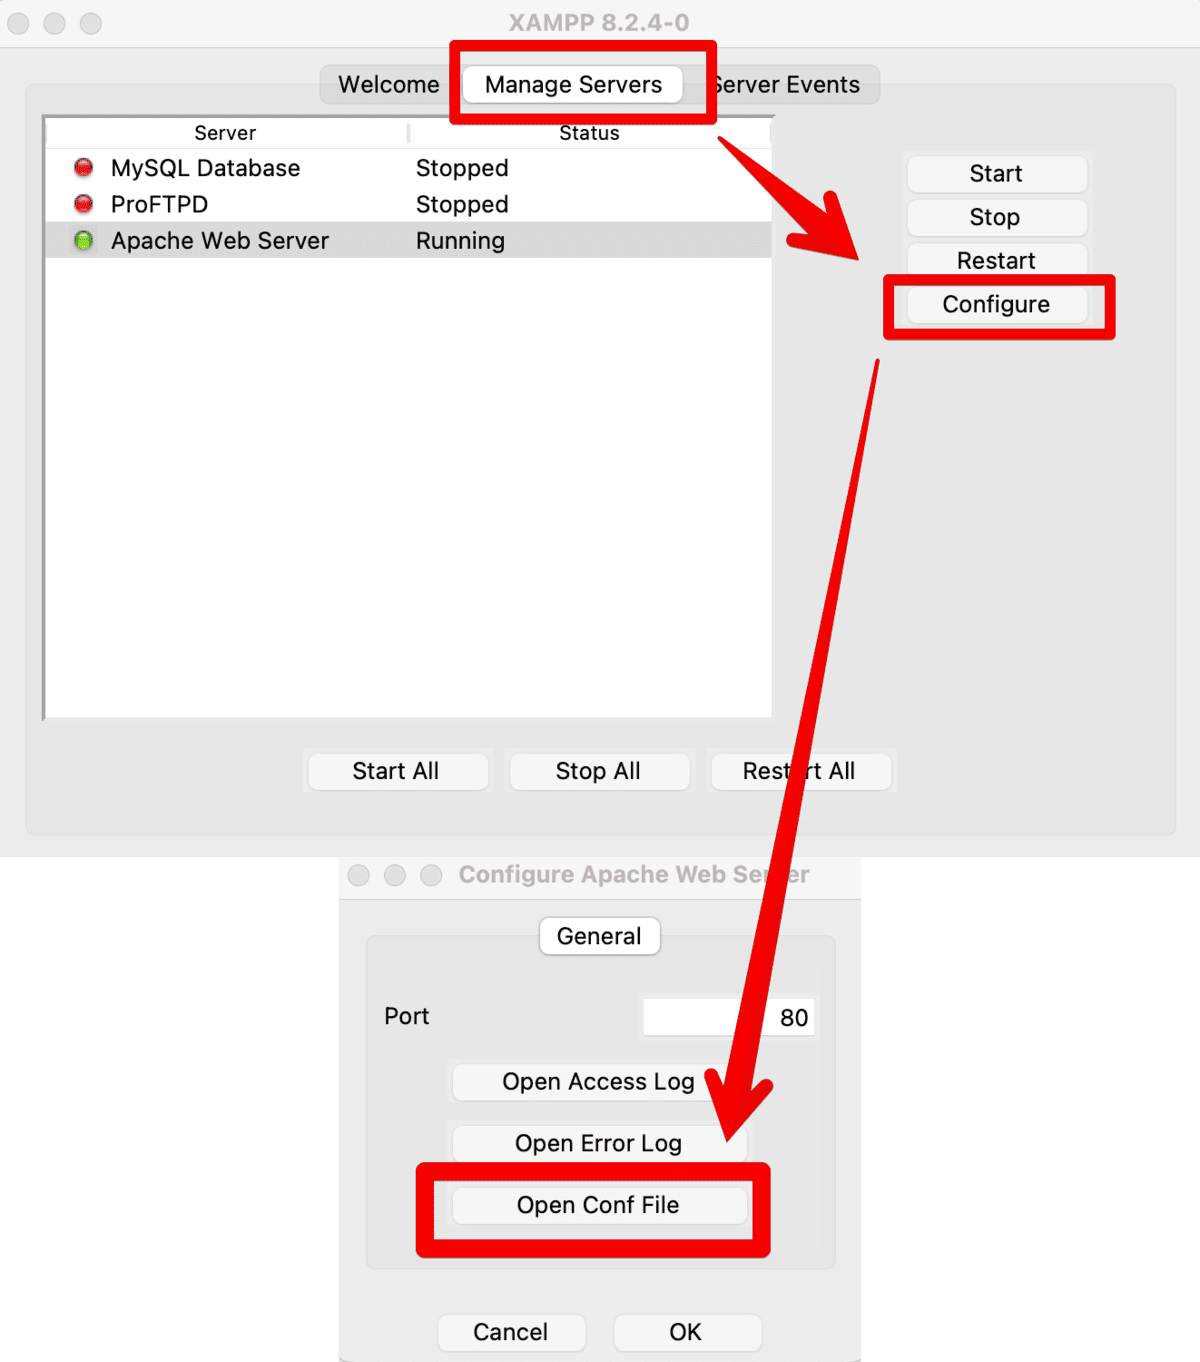
2. Make a backup of this file. Save its contents in a new text file.
3. In the file to be edited, now search for „Listen 80“ and replace it with „Listen 8080“.
4. Find your local IP.
Linux/MacOS: Open the terminal and type ifconfig (you may need to use sudo ifconfig). Look for inet under your network adapter to find your local IP address.
Windows: Open the command prompt and type ipconfig. Look for IPv4 Address to find your local IP address.
5. Insert your local IP into the XAMPP config file. Search for „ServerName localhost:80“ and replace it with your local IP:8080 (e.g. 192.168.1.156:8080).
6. Restart XAMPP. Then call up your IP:8080 (e.g. 192.168.1.156:8080) from another computer. You should now see the XAMPP dashboard again.
Preparing the Database in XAMPP for WordPress
WordPress consists of an SQL database and many files. To install WordPress, we therefore need a new, empty SQL database.
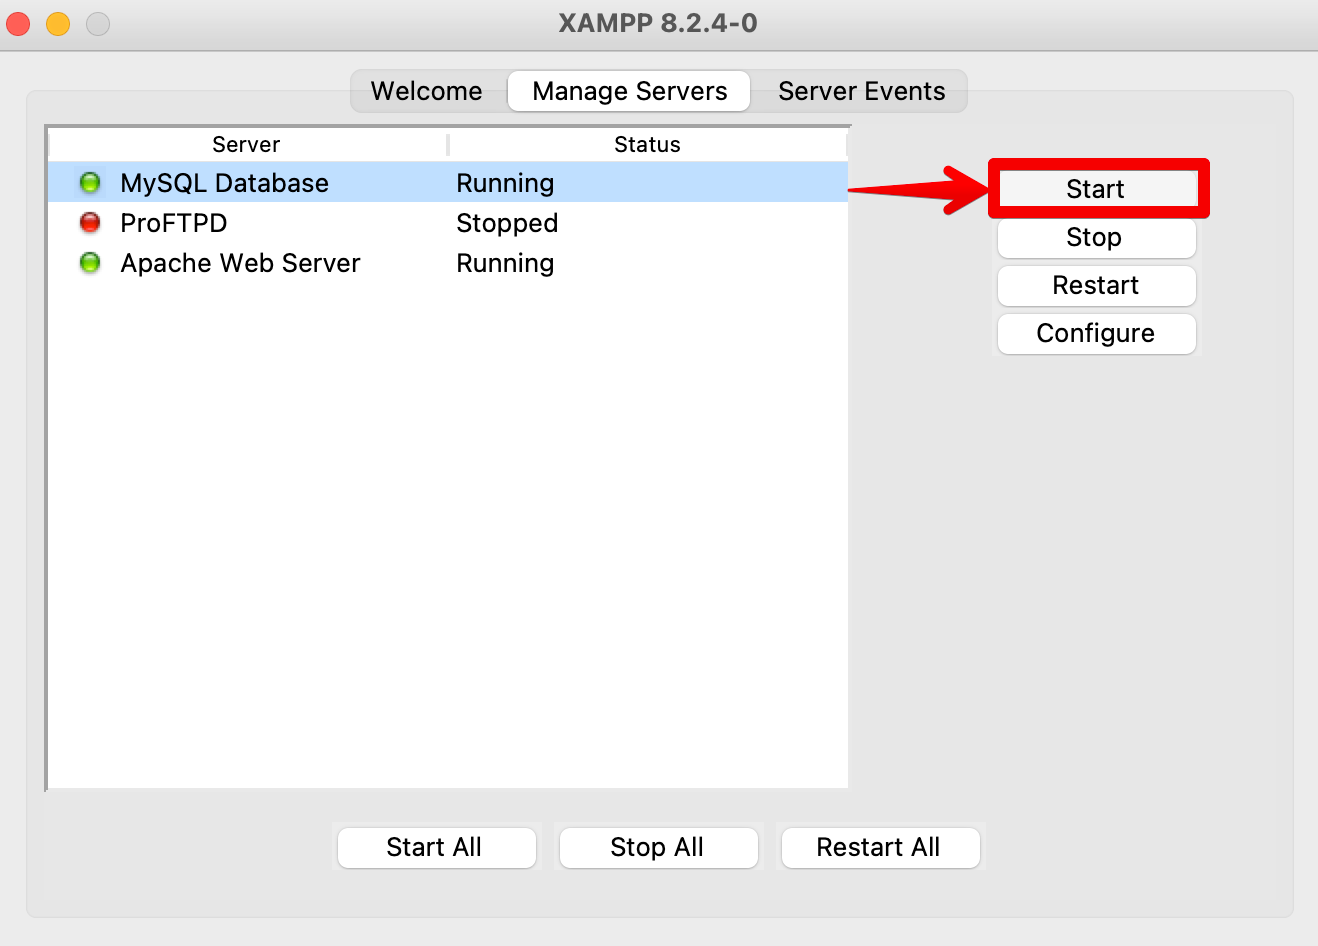
1. Make sure you have started XAMPP. Also start the SQL server.
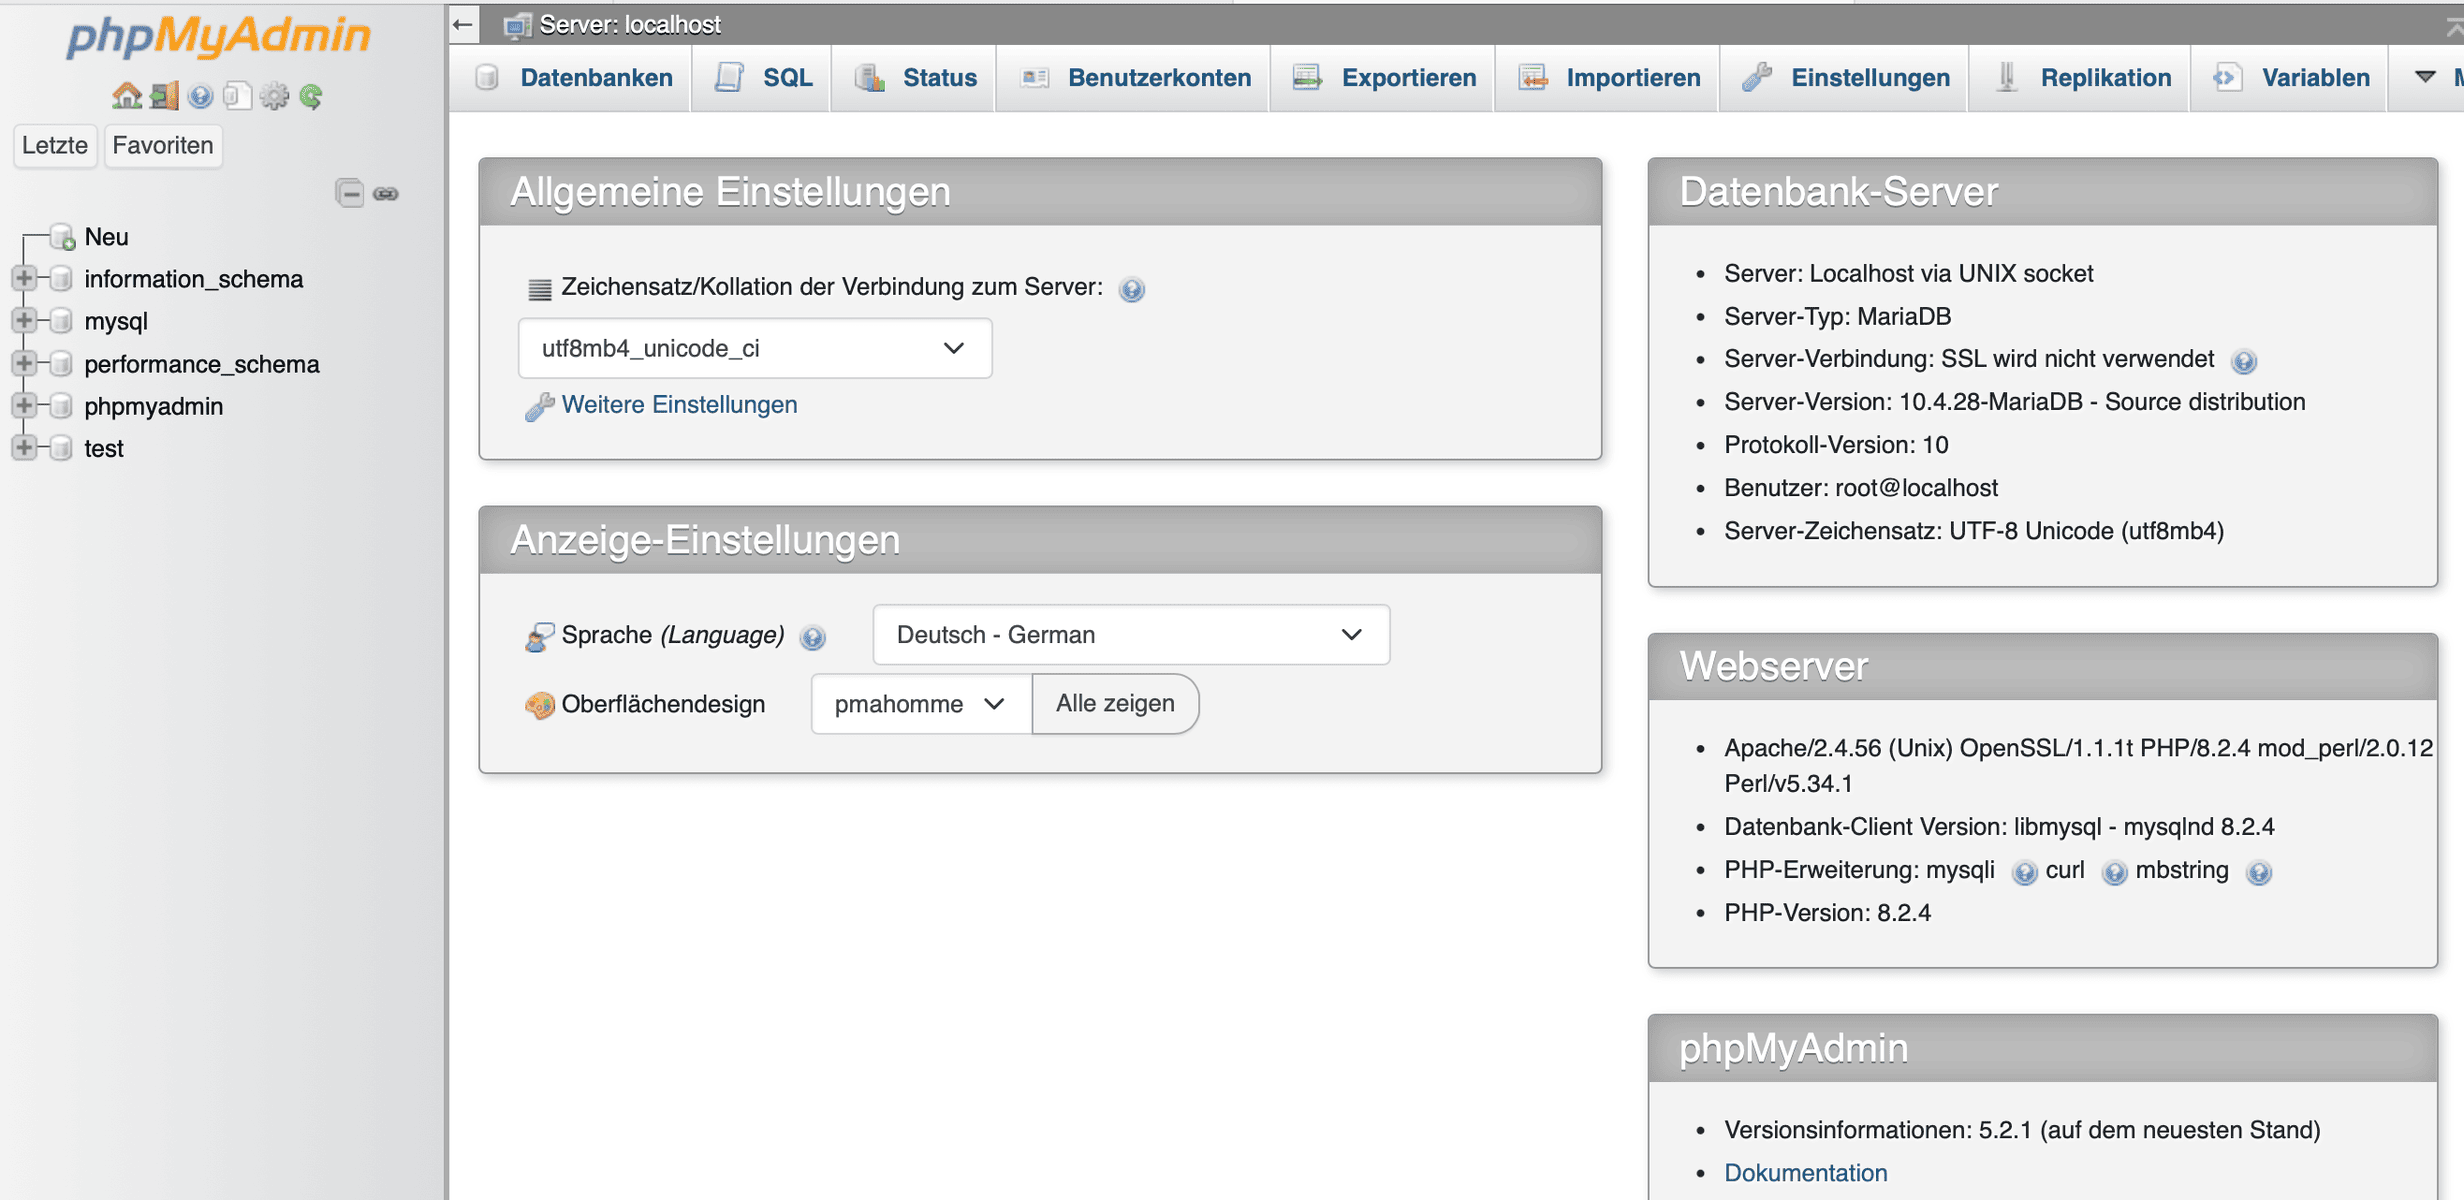
2. Go to: http://localhost/phpmyadmin/. You should see the phpMyAdmin dashboard.
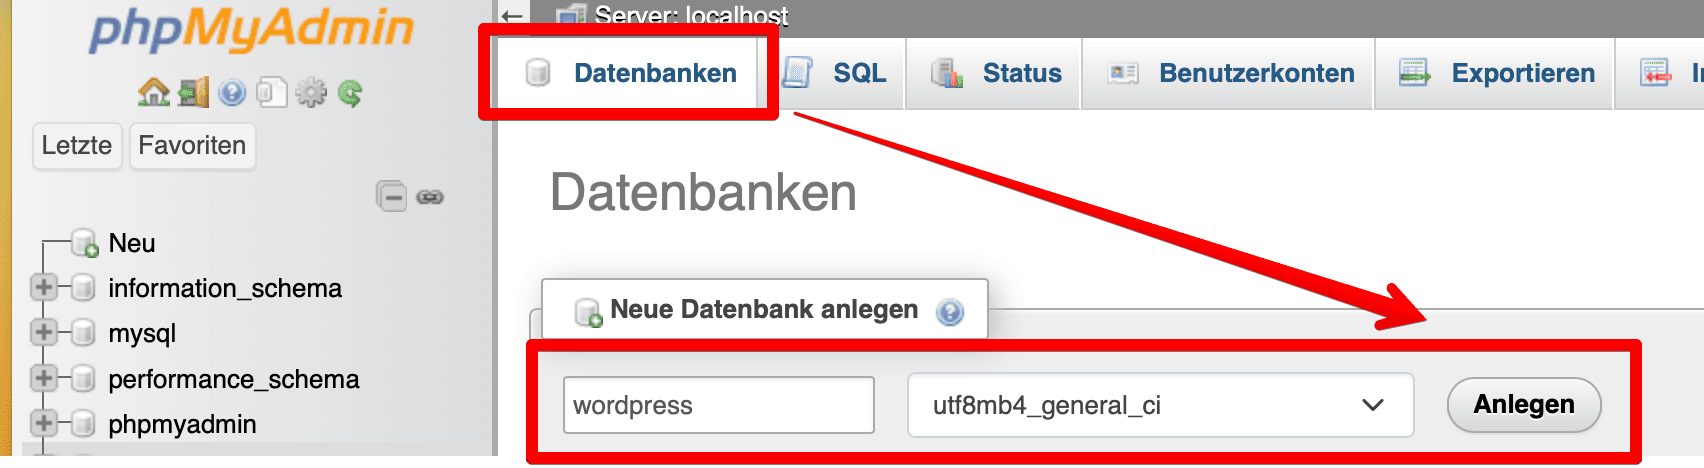
3. Create a new database. We can simply call it „wordpress“.
Setting Up a Local WordPress Instance in XAMPP
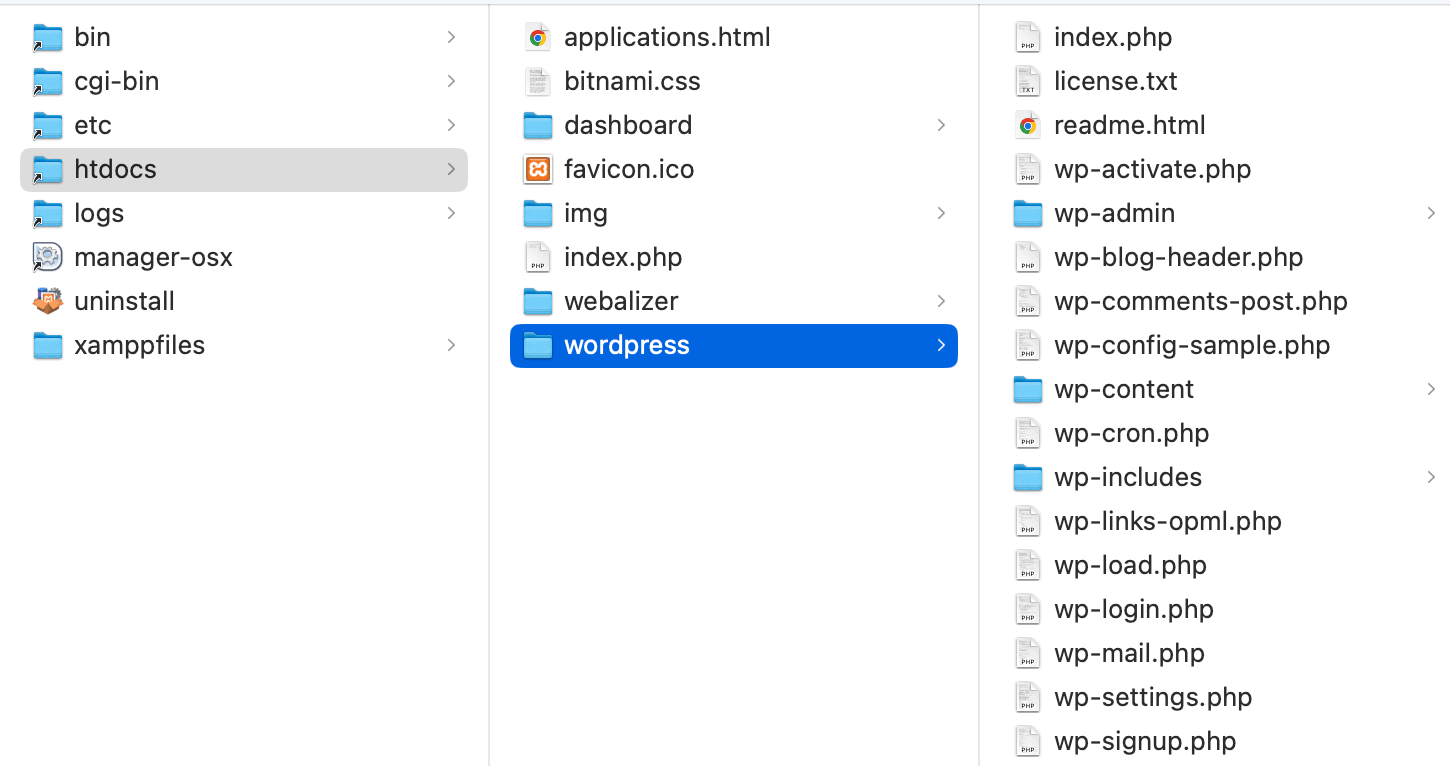
To set up a local WordPress site, first download WordPress. After extracting the ZIP file, copy the WordPress folder and paste it into the „htdocs“ folder of your XAMPP installation.
Before we start, make sure that all three services are active within XAMPP.
1. Download WordPress from WordPress.org.
2. Extract the WordPress zip file.
3. Copy the extracted WordPress folder.
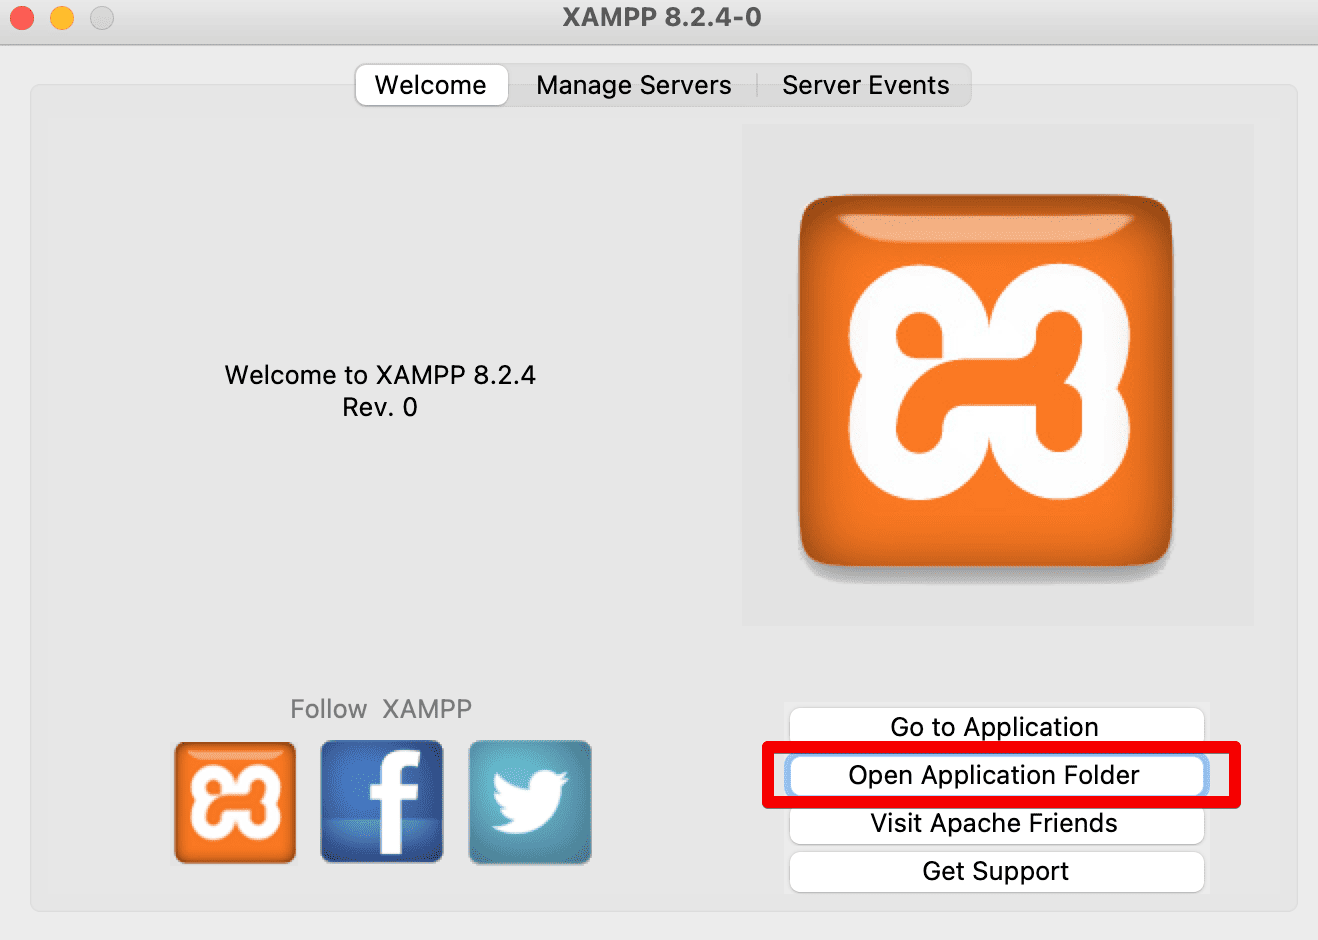
4. Open the folder of your XAMPP installation. You can find this under „Open Application Folder“.
5. Paste the WordPress folder into the „htdocs“ folder of your XAMPP installation. Make sure to rename the „wordpress“ folder to a name that makes it easier for you to identify your local website. In this case, however, we’ll simply stick with „wordpress“.
6. On your main computer: Open your web browser and enter the following URL: https://YOUR-IP/your-folder-name e.g. http://YOUR_IP:8080/wordpress. This leads to the WordPress installation wizard.
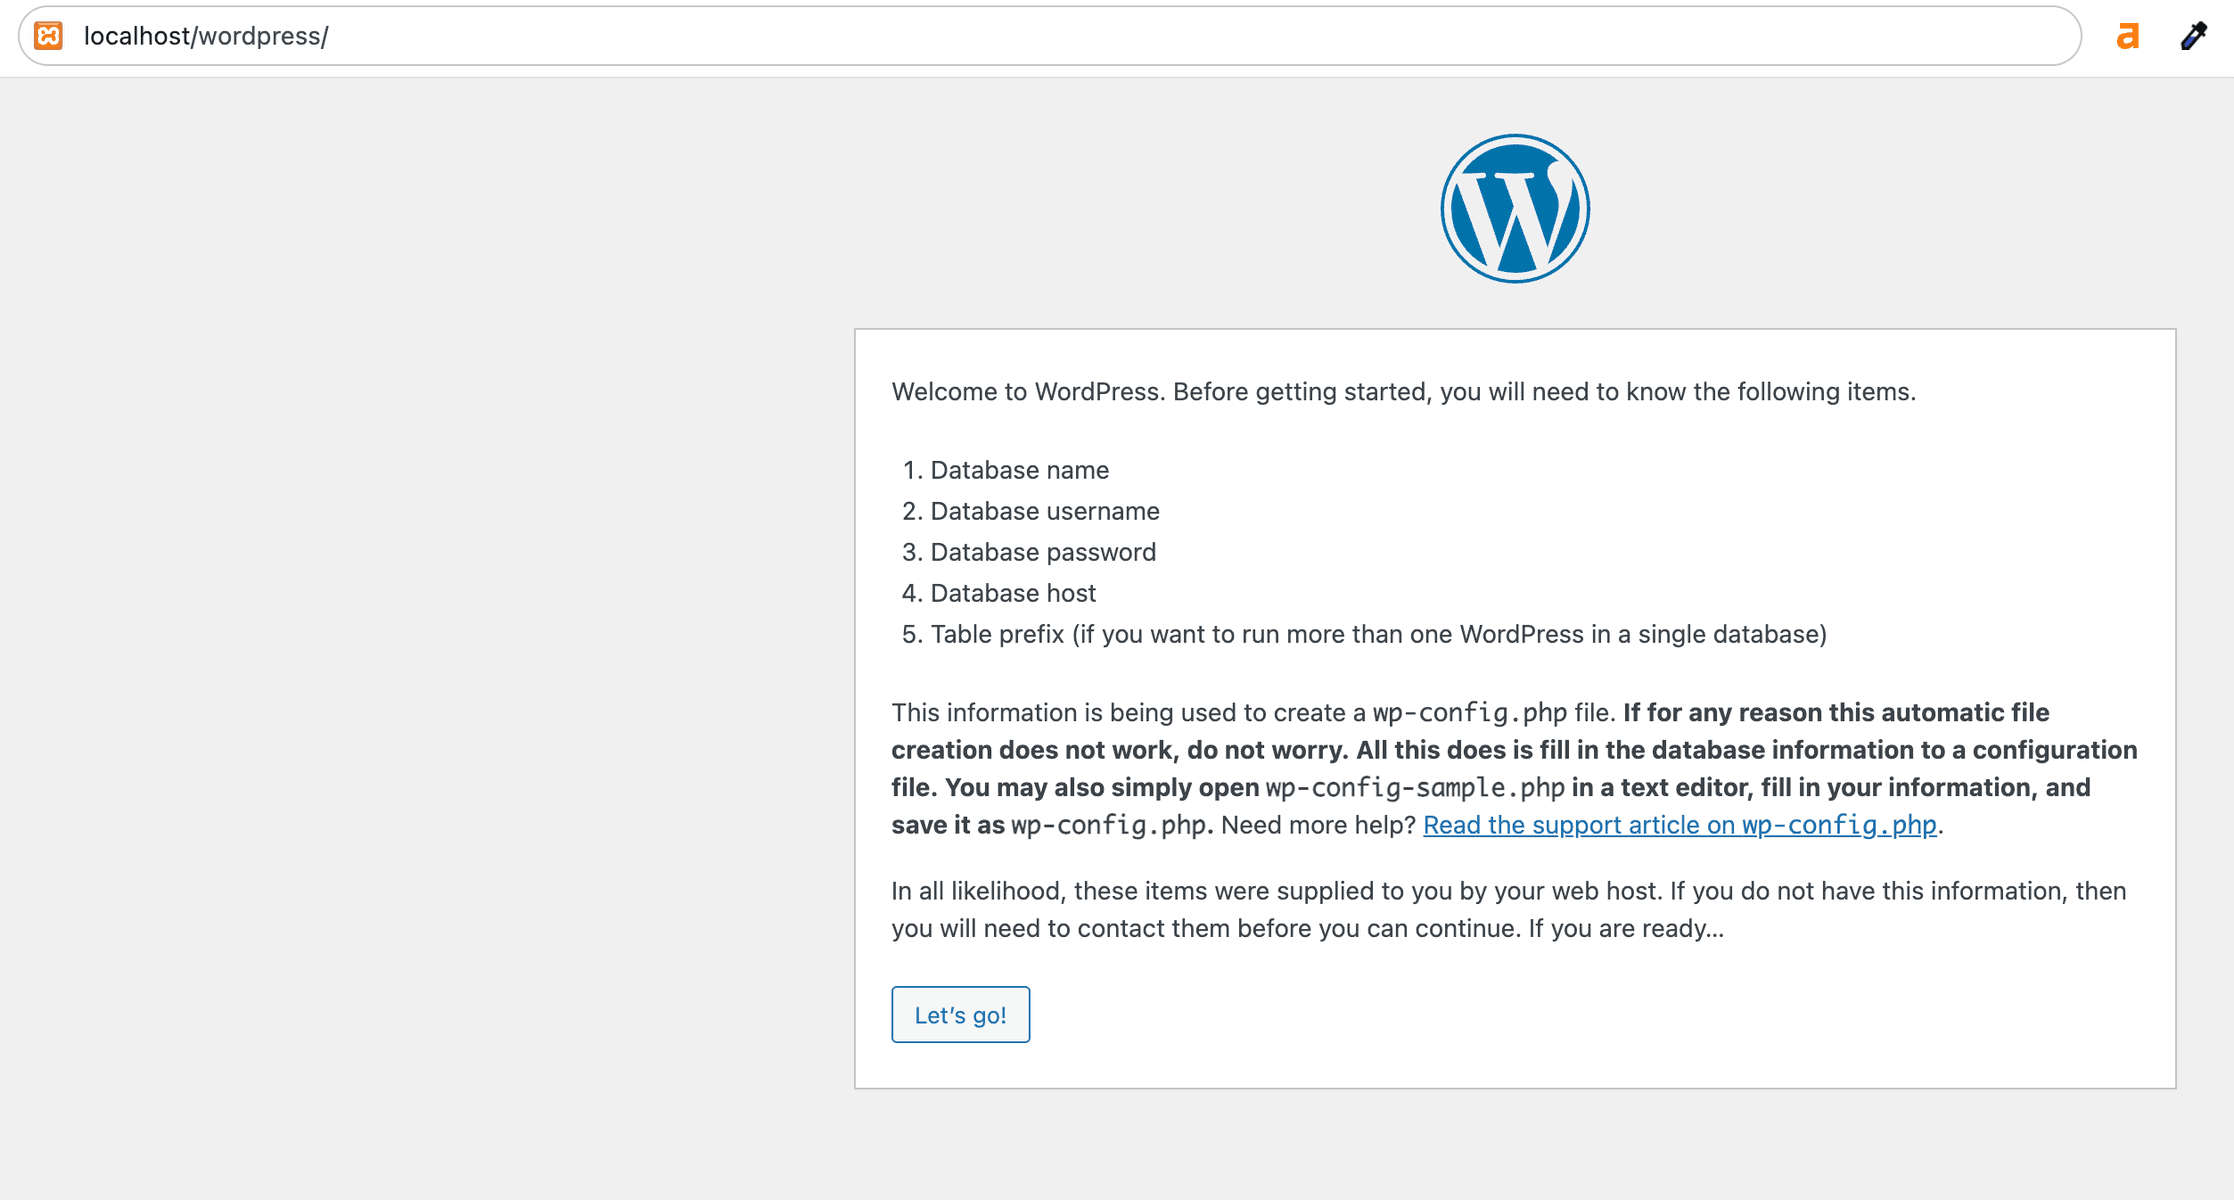
7. Click „Let’s go!“ and enter the information about your database.
Database Name: wordpress (or the database name you determined earlier)
Username: root
Password: leave empty
Database Host: localhost
Table Prefix: wp_
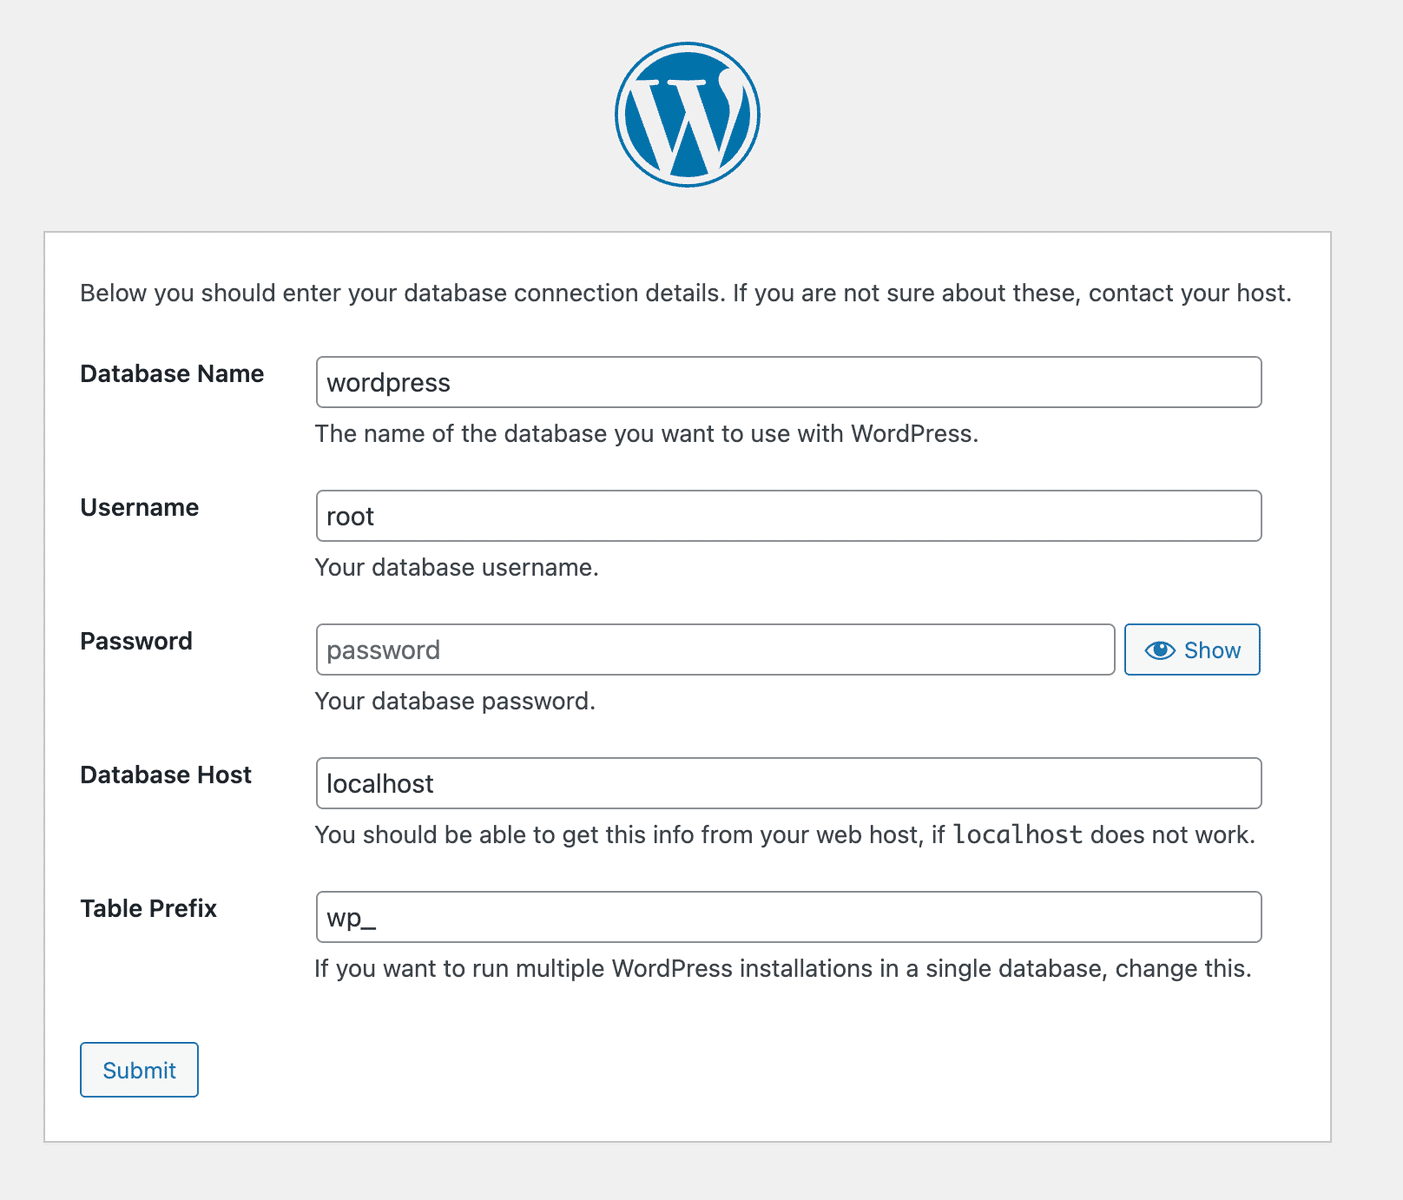
8. Fill in all the necessary fields and then click „Install WordPress“.
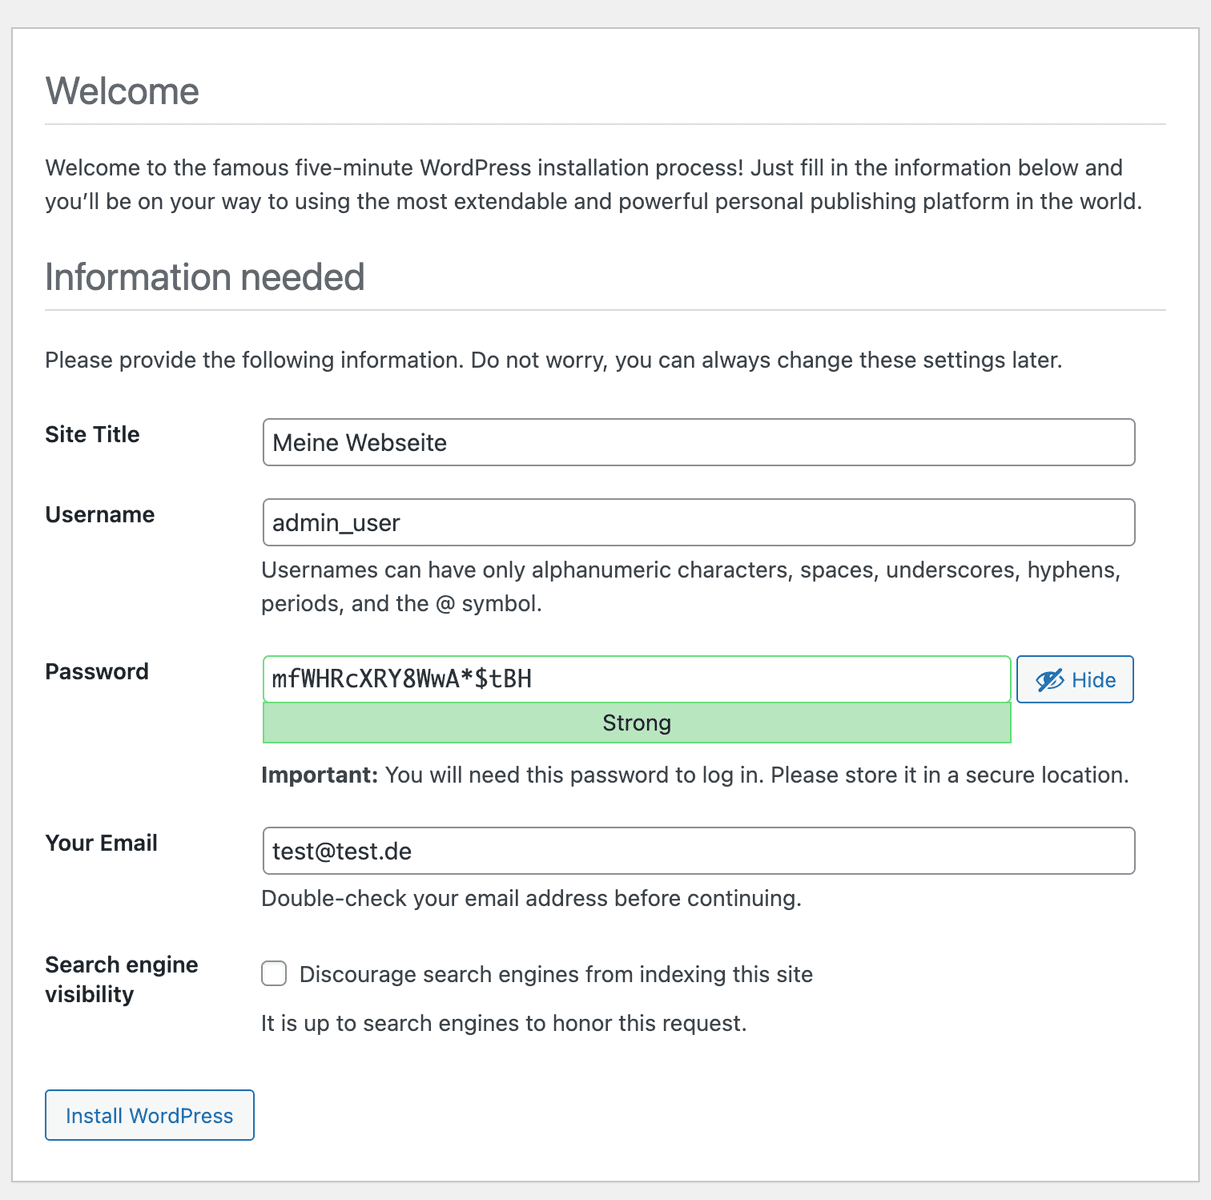
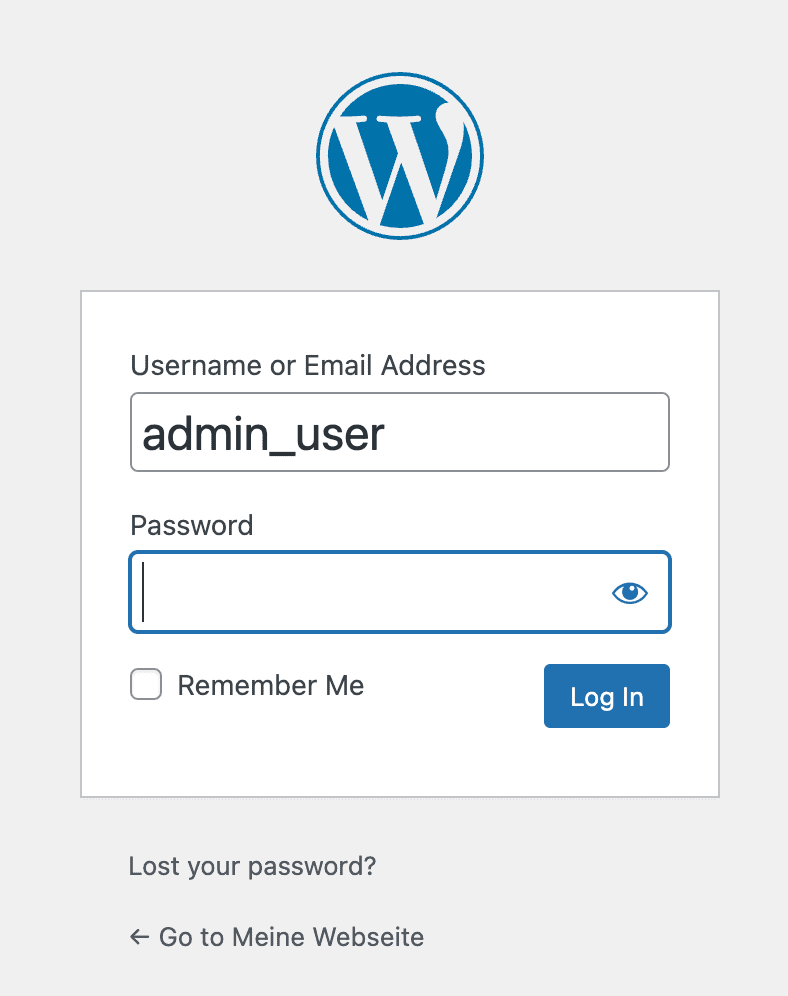
9. Your website is now created. Congratulations! Log in to the backend by appending /wp-admin to your domain, e.g. http://YOUR_IP:8080/wordpress/wp-admin/
10. Access the frontend of your WordPress intranet site via http://YOUR_IP:8080/wordpress
Intranet Templates: Woffice with BuddyPress
In my opinion, Woffice is an excellent solution for WordPress intranet and extranet platforms, ideal for companies of all sizes with a modern design. Since its debut in 2015, it has established itself as a reliable option with more than 9,000 users, over 100 updates, and an extensive range of features. It enjoys high recognition with a rating of 4.7/5 on Envato and is among the best BuddyPress themes.
Versatility and Ease of Use
What makes Woffice particularly attractive as a WordPress intranet theme is its versatility and modern design: from companies to schools to non-profit organizations, anyone can build an efficient communication portal. Ease of use is another plus. You don’t need any special technical knowledge to work with Woffice, which makes it interesting for both beginners and experienced developers.
Functionality
In terms of functionality, Woffice has a lot to offer: from project management to chat and knowledge base features and an event calendar, all the way to a customizable member dashboard and member directory. On top of that, it is compatible with a range of BuddyPress plugins.
Advantages and Costs
As for the advantages, Woffice is specifically geared toward intranet and extranet functions, unlike some other multi-purpose themes. It offers flexibility and a range of free extensions such as time tracking and surveys. Furthermore, thanks to advanced security features and LDAP integration, it is particularly suitable for business applications. For a one-time fee of 75 dollars, you get lifetime updates, which makes it a cost-effective choice.
Demo Version
You can easily try out Woffice as a theme for a WordPress intranet using the demo version. This allows you to extensively test all the functions of an intranet website before deciding to purchase. The demo gives a realistic insight into the user interface of the intranet portal. This way, you can find out without risk whether Woffice is the right solution for your own intranet or extranet project.
Conclusion
Setting up a WordPress-based intranet offers a wealth of opportunities to improve internal communication and productivity. The system is extremely customizable thanks to its open-source structure and a huge community.
By using XAMPP for the local installation, you can create a secure and high-performing intranet solution in no time.
Woffice is an excellent example of a versatile and user-friendly theme developed specifically for intranet and extranet applications.
In my work as a WordPress expert, I have already created several intranets. If you need someone to help you with this, I would of course be delighted to receive a contact request!